


How to Use 3D Foam Puff Embroidery: Step-by-Step Guide

Quick Answer: 3D foam puff embroidery creates raised lettering and designs by placing embroidery-grade EVA foam underneath dense satin stitches. For clean results, use a design specifically digitized for 3D puff, typically pair it with 2mm–3mm embroidery foam, stabilize the garment correctly, and make sure exposed ends are properly capped. Stitch the flat elements first, place the foam over the puff area, run the dense satin section, tear away the perforated excess, and clean up any remaining foam carefully with tweezers or controlled heat.
Whether you are customizing baseball caps at home or producing branded headwear for customers, 3D puff embroidery can instantly make a design look more premium.
The technique itself is not especially complicated. The challenge is that puff embroidery cannot usually be treated like ordinary flat embroidery.
Foam thickness, satin density, stitch direction, underlay, capping, machine speed, and the digitized file all affect the final result.
This guide explains how to use 3D foam puff embroidery step-by-step, how to choose your supplies, and how to avoid the most common mistakes.
What Is 3D Foam Puff Embroidery?
3D foam puff embroidery is a machine embroidery technique that places a layer of foam between the garment and the top embroidery stitches.
As the machine stitches dense satin columns over the foam, the foam remains underneath the thread and creates a raised, three-dimensional appearance.
Most embroidery puff foam is made from EVA, or ethylene-vinyl acetate. Purpose-made embroidery foam is designed to compress beneath the stitches and perforate around the edges so the unwanted material can be torn away after stitching.
You will commonly see puff embroidery used for:
- Baseball caps and snapbacks
- Sports and team headwear
- Varsity jackets
- Hoodies and sweatshirts
- Bags and backpacks
- Monograms and initials
- Bold logos and lettering
- Boutique and streetwear apparel
The biggest difference between flat embroidery and 3D puff embroidery is the way the design is digitized.
A normal satin-stitch design may leave gaps when stitched over foam. A proper puff design uses significantly tighter satin coverage, controlled stitch direction, and special finishing stitches to completely encase the foam.
What Is the Difference Between Flat Embroidery and 3D Puff Embroidery?
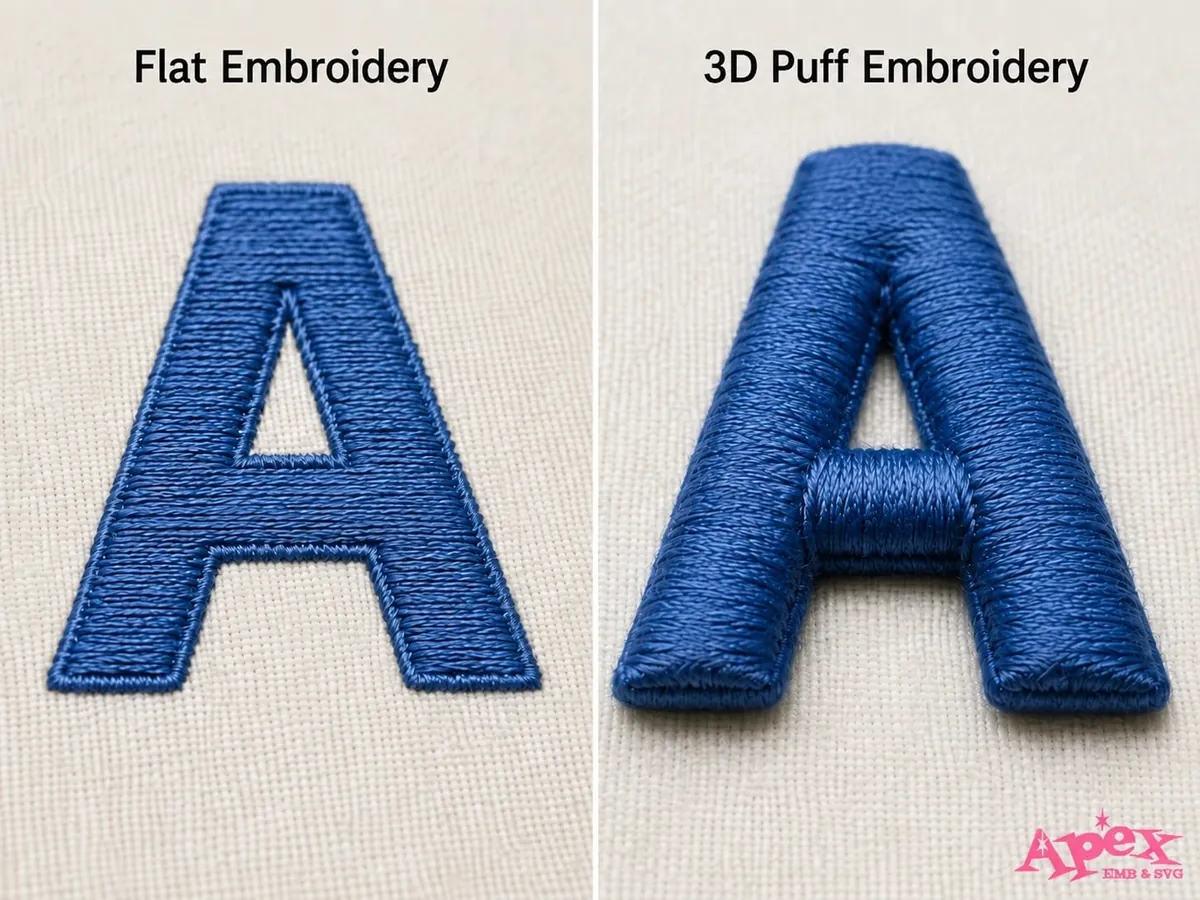
Flat embroidery places thread directly against the fabric or garment.
Puff embroidery adds a foam layer underneath selected parts of the design, so the stitches must travel over a much thicker surface.
That changes several digitizing requirements.
A successful puff design generally needs:
- Denser satin stitching
- Proper pull compensation
- End caps on exposed satin columns
- Stitch sequencing that keeps unnecessary stitches from crossing the foam
- Simple, sufficiently wide shapes that can hold their dimension
Puff embroidery works especially well with bold block letters and wider satin columns. Very fine details, tiny lettering, and complicated fill areas are usually better embroidered flat.
What Supplies Do You Need for 3D Puff Embroidery?
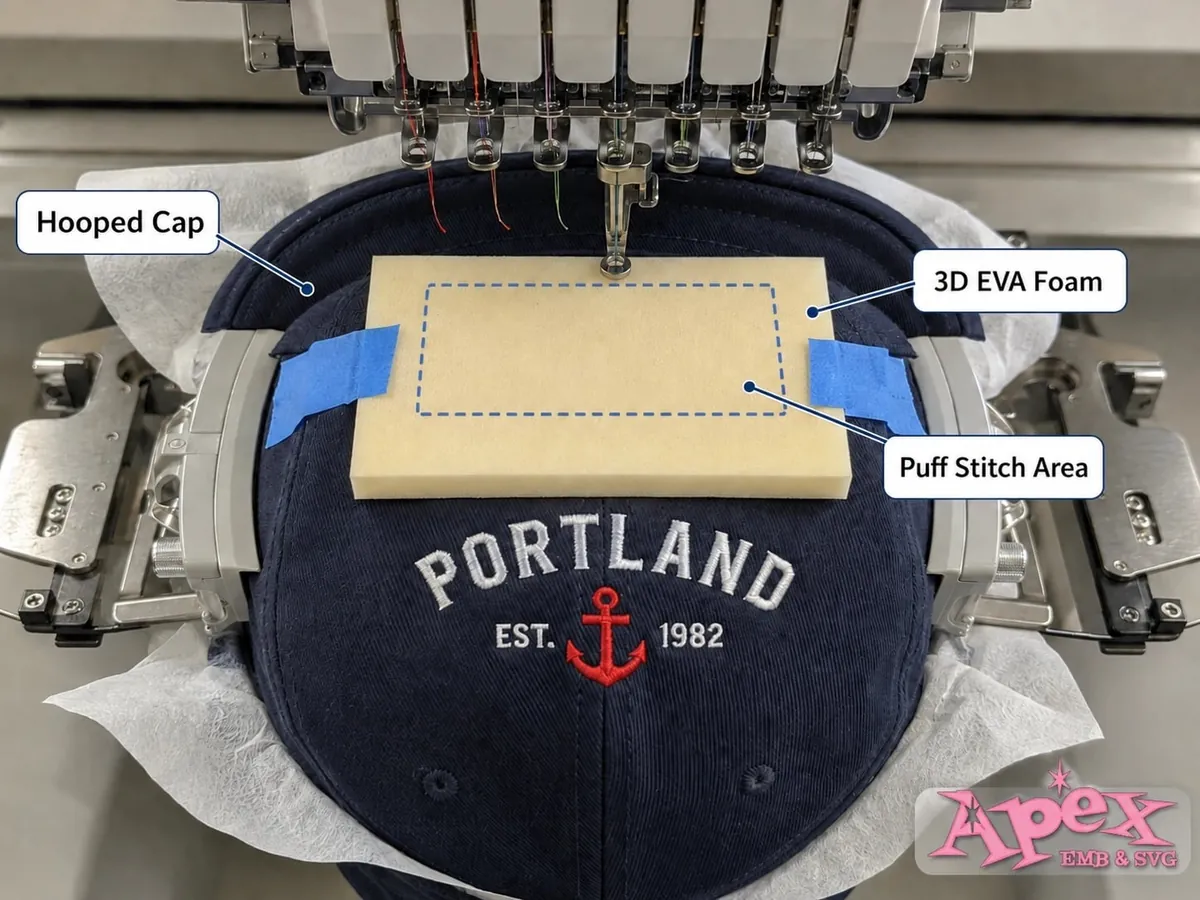
1. 3D Embroidery Foam
For most projects, 2mm–3mm embroidery foam is an excellent starting point.
Two-millimeter foam produces a more subtle raised effect, while 3mm foam creates a stronger dimensional appearance commonly seen on commercial caps.
Purpose-made embroidery foam is preferable to random craft foam because it is manufactured to perforate and tear more predictably during stitching.
Whenever possible, match your foam color to your embroidery thread. If a small piece remains visible between stitches, a matching foam color makes the imperfection much less noticeable.
2. A Specialized 3D Puff Digitized File
This is one of the most important requirements.
Do not assume that a standard embroidery design can simply be stitched over foam.
A design intended for puff embroidery should be digitized specifically for the technique, with adequate density, compensation, sequencing, and capped edges.
Apex Embroidery Designs offers hand-digitized embroidery fonts and designs, including files created specifically for raised 3D embroidery.
Internal link: Apex Embroidery Designs 3D Puff Collection
3. The Correct Embroidery Needle
A fresh 75/11 sharp embroidery needle is a reliable starting point for many puff embroidery projects, particularly caps. Some machine, thread, and fabric combinations may require a different needle, so always test before starting production.
The goal is clean foam penetration without excessive thread shredding or needle stress. Professional digitizing guidance also commonly recommends true sharp needles for cap puff embroidery.
4. Stabilizer or Cap Backing
Your stabilizer must support both the garment and the additional stitch density.
For garments, choose cutaway or tearaway stabilizer according to the fabric's stretch, weight, and construction.
For caps, use an appropriate cap backing and make sure the front panel is held firmly without distortion.
Poor stabilization can cause puckering, registration errors, and uneven puff height.
5. Tweezers and Controlled Heat
Keep a pair of embroidery tweezers nearby for removing tiny pieces of foam from enclosed areas such as the centers of letters.
A heat gun, small craft iron, or similar controlled heat source can also help shrink fine foam particles after the excess has been removed.
Use heat cautiously. Too much heat can damage the thread, garment, or foam.
Foam Thickness vs. Satin Stitch Density
There is no single density value that works for every embroidery machine, foam brand, thread, or digitizing program.
However, the following ranges provide useful starting points for testing:
| Application | Foam Thickness | Approx. Satin Spacing | Recommended Approach |
|---|---|---|---|
| Standard flat embroidery | None | About 0.35–0.45mm | Normal satin coverage |
| Light puff effect | 2mm | About 0.25–0.30mm | Increase coverage and test |
| Strong puff effect | 3mm | About 0.20–0.28mm | Dense satin with capped ends |
| Extra-firm/tall puff | 3mm+ dense foam | Project-specific | Test density, stitch length, and compensation carefully |
Commercial embroidery guidance commonly recommends very dense satin stitching for foam because the stitches must both cover and perforate the material. Madeira, for example, recommends dense satin settings and emphasizes creating end caps where ordinary satin stitches would leave foam exposed.
Always run a sample before embroidering a finished garment or customer order.
How Do You Stitch 3D Puff Embroidery Step by Step?
Step 1: Prepare and Hoop the Garment
Begin with proper stabilization.
Hoop the garment firmly enough to prevent movement, but avoid stretching the fabric unnaturally.
If you are embroidering a hat, make sure the cap is securely mounted and the embroidery area is smooth against the cap frame.
Registration becomes especially important with puff because dense stitching puts more stress on the material than ordinary flat embroidery.
Step 2: Stitch Flat Details and Underlay First
Run all background embroidery, flat lettering, placement lines, and other non-puff elements before adding the foam.
The digitized file should contain a programmed stop before the machine reaches the 3D section.
When the machine stops, you know it is time to place the foam.
This sequence prevents unnecessary stitches from traveling through the foam and crushing areas that are supposed to remain raised.
Step 3: Lay the 3D Foam Over the Target Area
Cut a piece of foam large enough to completely cover the puff section.
Place it directly over the design area.
You can secure the edges with painter's tape or a light application of temporary embroidery adhesive. Keep tape and adhesive away from the actual stitch path whenever possible.
The foam does not need to be hooped separately.
It simply sits on top of the fabric while the machine stitches through it.
Step 4: Stitch the Capping and Dense Satin Sections
Restart the machine.
A properly digitized file will contain the stitches required to perforate, cover, and close the foam.
At exposed ends of letters or shapes, special perpendicular stitches—commonly called end caps or capping stitches—help seal the foam inside the satin column.
The primary satin stitches then wrap over the foam, compressing it while leaving enough material underneath to create the raised appearance.
Avoid running your machine too aggressively.
For challenging cap puff embroidery, slowing production to around 500–600 stitches per minute is a useful troubleshooting starting point because the added material increases needle and thread stress. Ricoma also recommends this slower range for 3D puff cap work.
Step 5: Tear Away the Excess Foam
Once the puff section is complete, remove the project from the machine if necessary and gently pull away the foam surrounding the stitches.
Properly perforated embroidery foam should separate cleanly along the stitched edges.
Do not aggressively pull tiny fragments from inside enclosed letters. Use tweezers to remove or tuck them underneath the satin stitches.
Step 6: Clean Up Exposed Foam
Inspect the embroidery closely.
If tiny foam particles remain visible, first try pushing them underneath the thread with tweezers.
For very small exposed pieces, controlled heat can shrink the foam.
Keep the heat source moving and test it before applying it to a finished customer item. Puff foam is heat-sensitive, and excessive heat can damage the embroidery or garment.
How Do You Digitize for 3D Foam Embroidery?
The quality of the finished puff embroidery starts with the digitized file.
Here are the most important rules.
Increase Satin Stitch Density
Standard satin embroidery does not normally provide enough coverage for puff foam.
The satin stitches must be closer together so they completely wrap the foam and help perforate its outer edges.
As a general testing range, puff embroidery may use approximately 0.20mm–0.28mm satin spacing, compared with roughly 0.35mm–0.45mm for many ordinary flat satin applications.
Exact settings depend on the software, thread, foam, garment, and design.
Cap Every Exposed End
Imagine a block letter such as T or E.
If the end of a satin column is left open, the foam can protrude from that edge after stitching.
Capping stitches close these areas before or during the main satin sequence, creating the clean edges associated with professional 3D embroidery.
Avoid Unnecessary Running Stitches Across Foam
Running stitches can crush the foam and create visible valleys.
The stitch sequence should be planned so travel stitches do not cross puff areas unnecessarily.
This is one reason simply converting a normal embroidery file into a denser design rarely produces professional results.
Use Shapes That Work With Puff
Puff embroidery performs best with bold shapes, block lettering, monograms, and wider satin columns.
Extremely narrow lines, tiny text, sharp internal details, and complicated fill patterns may not provide enough room for the foam to rise cleanly.
Test Before Production
Even an expertly digitized design should be tested on the actual foam, thread, machine, and garment combination before running a large order.
A few minutes spent testing can prevent dozens of rejected caps.
Want professional puff results without manually rebuilding your artwork?
Ready to create clean 3D foam embroidery? Explore Apex Embroidery Designs' collection of pre-digitized 3D puff fonts and designs, or submit your artwork for professional custom embroidery digitizing.
Apex states that its embroidery fonts and designs are hand-digitized, and its custom digitizing service supports major machine embroidery formats for both personal and commercial projects.
How Do You Fix Common 3D Foam Embroidery Problems?
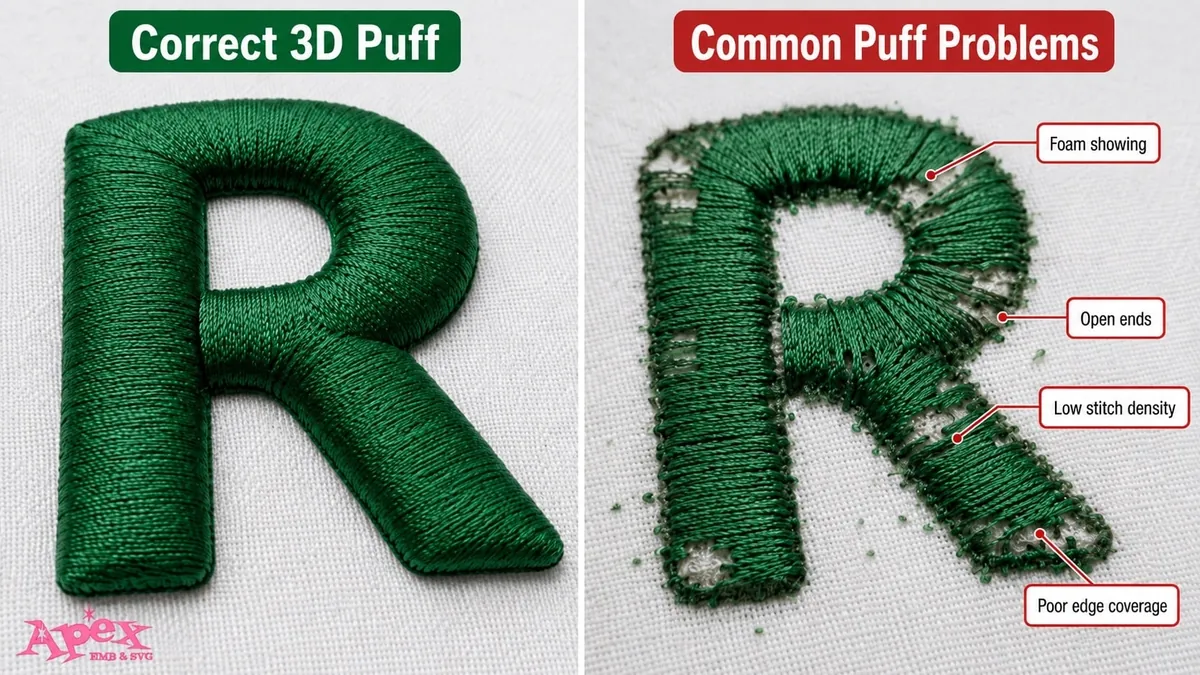
Why Is Foam Showing Through the Thread?
Possible causes:
- Satin density is too low
- Foam color contrasts with the thread
- Satin columns are too narrow
- Puff digitizing is incomplete
- Foam is too thick for the design
Fix: Match foam color to thread, increase coverage where appropriate, check the digitizing, and test a thinner foam if necessary.
Why Is the Foam Hard to Tear Away?
The needle may not be perforating the foam effectively, or the design may lack enough edge-cutting stitches.
Fix: Install a fresh sharp needle, verify the digitizing, and use purpose-made embroidery foam that is designed to tear cleanly.
Why Does My Embroidery Thread Keep Breaking?
Puff embroidery creates more resistance than normal stitching.
Fix:
- Install a fresh needle.
- Reduce machine speed.
- Check the thread path and needle alignment.
- Test your upper tension rather than making large adjustments immediately.
- Confirm that the design is not excessively dense.
- Make sure the foam thickness matches the digitized design.
Tension adjustments should be incremental. Excessively tight tension can compress the foam and reduce the raised effect.
Why Does My Puff Embroidery Look Flat?
The foam may be too soft or thin, the tension may be too tight, or the satin stitches may be compressing the design excessively.
Try a denser or thicker embroidery foam and confirm that the design was actually digitized for puff.
Frequently Asked Questions About 3D Puff Embroidery
Can I Use Craft Foam Instead of Embroidery Foam?
Technically, some EVA craft foams can work, but results are unpredictable because craft foam varies considerably in density, thickness, elasticity, and tear behavior.
For consistent results—especially on customer orders—use foam specifically manufactured for machine embroidery.
What Is the Best Foam Thickness for Machine Embroidery?
For most beginners, 2mm or 3mm foam is the best starting point.
Use 2mm when you want moderate dimension or are working with smaller elements. Use 3mm for the bold raised lettering commonly seen on baseball caps and commercial headwear.
Some manufacturers also produce thicker or extra-dense foams for more dramatic effects, but these require careful digitizing and testing.
Can You Wash 3D Puff Embroidery?
Yes, when purpose-made embroidery foam is used and the design is stitched correctly.
Many commercial EVA embroidery foams are water-resistant and can be machine washed; some manufacturers also rate their foam for dry cleaning. Always follow the care instructions for both the garment and the specific foam product rather than assuming all EVA foam behaves identically.
To preserve the raised appearance, avoid unnecessary high heat.
What Machine Formats Work for 3D Puff Embroidery?
The technique is not restricted to one file extension.
3D puff designs may be supplied in common machine formats such as:
- PES
- DST
- EXP
- JEF
- HUS
- VP3
- XXX
- ART
Apex Embroidery Designs offers downloads in multiple major embroidery formats, while many of its embroidery fonts are also available in BX format for Embrilliance users.
Remember that the digitizing itself, not simply the file extension, determines whether the design is suitable for 3D puff.
Can I Use 3D Puff Embroidery on Shirts and Hoodies?
Yes, but fabric stability matters.
Puff embroidery puts substantial stitch density and weight into a relatively small area. Heavy hoodies, jackets, canvas, bags, and structured garments usually handle it better than thin, lightweight shirts.
If you use puff on softer apparel, stabilization and design size become especially important.
Create Cleaner 3D Puff Embroidery With the Right File
Great 3D foam embroidery is not simply ordinary embroidery with a piece of foam underneath it.
Professional results come from combining the right foam thickness, stable hooping, dense satin coverage, controlled machine settings, properly capped edges, and—most importantly—a design built specifically for puff embroidery.
Start with 2mm–3mm embroidery foam, match the foam to your thread color, stitch all flat elements first, place the foam only when the puff section begins, and test your settings before running a finished garment.
And if digitizing is the part slowing you down, you do not have to start from scratch.
Ready to create clean, professional 3D foam embroidery?
Explore Apex Embroidery Designs' pre-digitized 3D puff fonts, monograms, and embroidery designs, or send your own logo or artwork to Apex for custom embroidery digitizing.
How to stitch a 3D Puff Embroidery Design using a Innov-ís 1500D Brother sewing machine. Supplies needed an iron or hair dryer, a 3D Puffy Design and Embroidery Foam. Try 2mm or even easier 1mm foam. Do not stack multiple foams use singles.
Find your design for this project on our 3D Puffy Designs page!