


How to Machine Applique Embroidery - Extra Detailed

Machine applique embroidery combines fabric, thread, and machine stitching to create dimensional designs with less dense embroidery than traditional fill-stitch patterns. Instead of covering an entire design area with thousands of stitches, applique uses pieces of fabric as part of the artwork, then secures and finishes those pieces with decorative stitching.
For beginners, the process can look complicated because an applique embroidery file usually pauses several times during stitching. However, once you understand what each color stop is asking you to do, the workflow becomes surprisingly straightforward.
At Apex Embroidery Design, professional applique files are digitized around this exact sequence, helping embroiderers move confidently from placement to tack-down, trimming, and final decorative stitching.
Quick Summary: How to Machine Applique Embroidery in 4 Core Phases
Machine applique embroidery follows four essential phases:
- Placement Stitch → Stitch the outline showing exactly where the applique fabric should go.
- Tack-Down Stitch → Cover the placement outline with applique fabric and stitch it securely in place.
- Trimming → Carefully cut away the excess fabric close to the tack-down stitching.
- Final Stitching → Cover the raw fabric edge with satin stitch, blanket stitch, zig-zag, or another decorative border.
For the cleanest results, use the correct stabilizer, prepare your applique fabric with fusible web when appropriate, hoop your project securely, and trim as close to the tack-down line as possible without cutting the stitches.
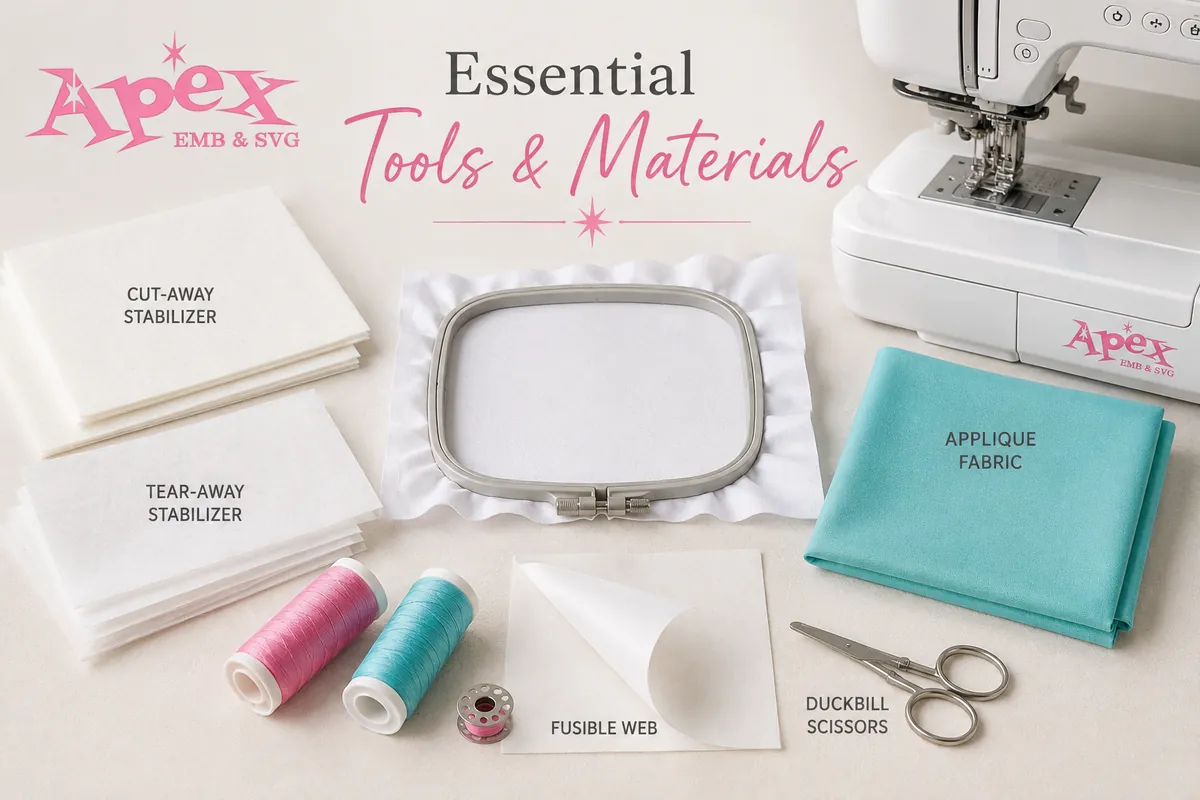
1. Essential Tools & Materials Checklist
Successful machine applique starts long before you press the start button on your embroidery machine. Good preparation prevents puckering, loose edges, misalignment, and uneven satin borders.
Here are the basic materials you should have ready.
| Tool or Material | Purpose | Recommended Use |
|---|---|---|
| Embroidery Machine | Stitches the applique design | Use a machine compatible with your embroidery file format |
| Digitized Applique File | Controls placement, tack-down, and decorative stitching | Choose professionally digitized designs from Apex Embroidery Design |
| Base Fabric | The main garment, towel, bag, quilt block, etc. | Choose stable fabric suitable for machine embroidery |
| Applique Fabric | Creates the filled fabric portion of the design | Cotton is especially beginner-friendly |
| Cut-Away Stabilizer | Remains behind the embroidery for long-term support | Best for knits, stretchy garments, dense designs, and frequently washed items |
| Tear-Away Stabilizer | Tears away after embroidery is completed | Best for stable woven fabrics and lighter applique projects |
| Fusible Web | Adds structure to applique fabric | Products such as Heat'n Bond Lite are commonly used |
| Embroidery Thread | Creates the decorative stitching | Polyester embroidery thread is durable and versatile |
| Bobbin Thread | Supports stitching underneath | Use embroidery-specific bobbin thread where recommended |
| Duckbill Applique Scissors | Trims fabric close to the tack-down line | Ideal for precise applique trimming |
| Iron or Heat Press | Activates fusible backing and removes wrinkles | Follow the temperature recommendations for your fabric |
Cut-Away vs. Tear-Away Stabilizer
Choosing the correct stabilizer for applique embroidery is one of the most important decisions you will make.
Cut-away stabilizer provides permanent support. Because it stays behind the embroidered area, it is particularly useful when working with stretchy fabric, children's clothing, sweatshirts, knitwear, or designs with heavier satin stitching.
Tear-away stabilizer is easier to remove and works well with stable fabrics that do not stretch significantly. Cotton quilt blocks, canvas, and certain home decor fabrics may work well with a quality tear-away.
When in doubt, consider how much movement the finished item will experience. The more the fabric stretches, flexes, or goes through repeated washing, the more support it usually needs.
Why the Digitizing Quality Matters
The embroidery file controls more than the shape of the design. It determines the sequence, stitch direction, density, registration, and relationship between the placement stitch, tack-down stitch, and finishing border.
Professionally digitized applique files from Apex Embroidery Design are created to provide clear placement outlines, secure tack-down stitching, and properly aligned decorative borders. Good digitizing can greatly reduce problems such as thread bunching, shifted outlines, visible raw edges, and inconsistent satin coverage.
2. Step 1: Fabric & Stabilizer Preparation
The foundation of beautiful machine applique is proper preparation.
Skipping fabric preparation may save a few minutes at the beginning, but it can create much larger problems later.
Pre-Wash Your Fabric When Necessary
If your project will eventually be washed, consider pre-washing both the base fabric and the applique fabric.
Natural fibers such as cotton can shrink. If the applique fabric shrinks differently from the base fabric after embroidery, the finished design may wrinkle or distort.
After washing:
- Allow the fabric to dry completely.
- Press out wrinkles.
- Avoid stretching the fabric while ironing.
- Make sure the embroidery area is smooth before hooping.
Apply Fusible Web to the Applique Fabric
Fusible web is especially helpful for beginners because it gives lightweight fabric additional structure and helps keep applique edges flat after trimming.
A lightweight product such as Heat'n Bond Lite is often preferred for machine applique because it stabilizes the fabric without adding excessive bulk.
Generally, the process is:
- Cut a piece of fusible web slightly smaller than your applique fabric.
- Place the adhesive side against the wrong side of the fabric.
- Press according to the manufacturer's instructions.
- Allow the material to cool.
- Remove the paper backing when required.
Do not use excessively heavy fusible products unless your design specifically calls for them. Thick adhesives may make the project stiff and can interfere with needle penetration.
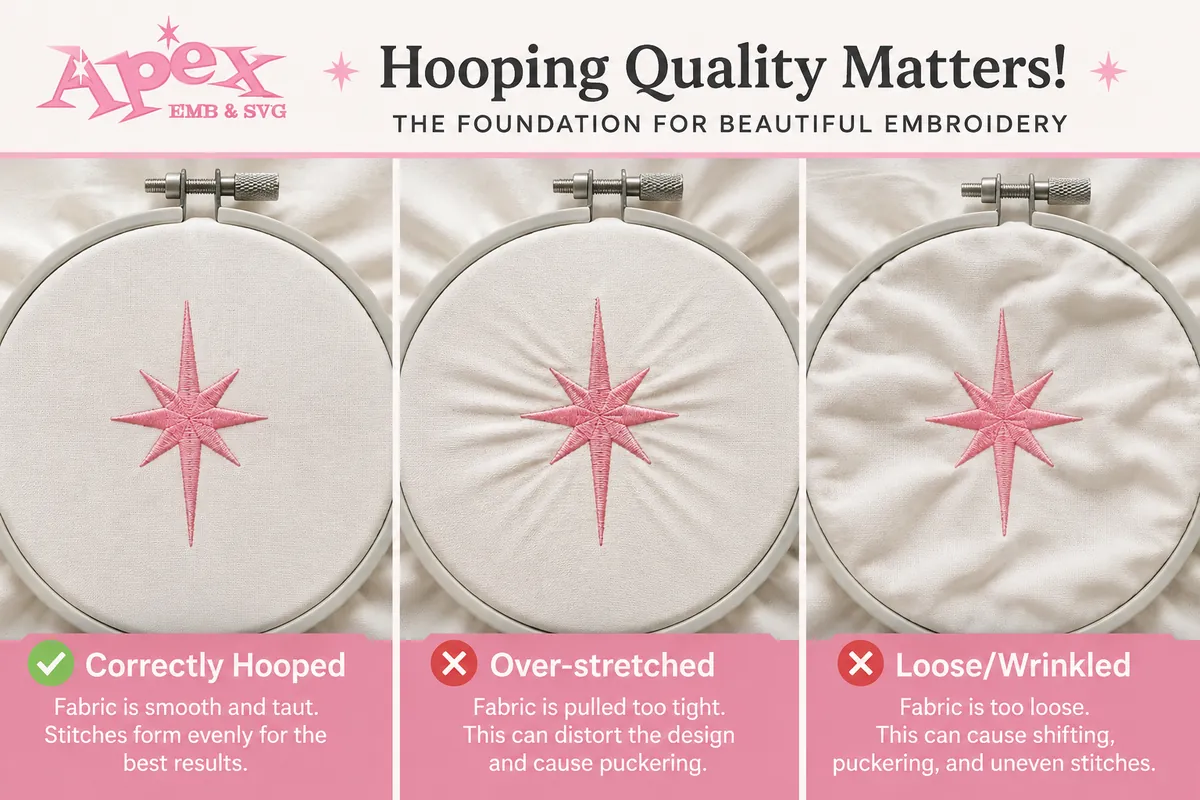
Hoop the Fabric Correctly
Proper hooping keeps your fabric and stabilizer stable throughout the embroidery sequence.
Place the stabilizer behind the base fabric and hoop both layers together whenever your project allows it.
Your fabric should be:
- Smooth
- Flat
- Secure
- Free from wrinkles
- Firm without being aggressively stretched
Think of proper hoop tension as stable rather than drum-tight. Stretching the fabric excessively during hooping can cause it to contract after being removed from the hoop, resulting in puckering around the finished embroidery.
If the item cannot be hooped easily, floating techniques may be appropriate, but beginners will usually achieve more predictable results by hooping the fabric and stabilizer together whenever possible.
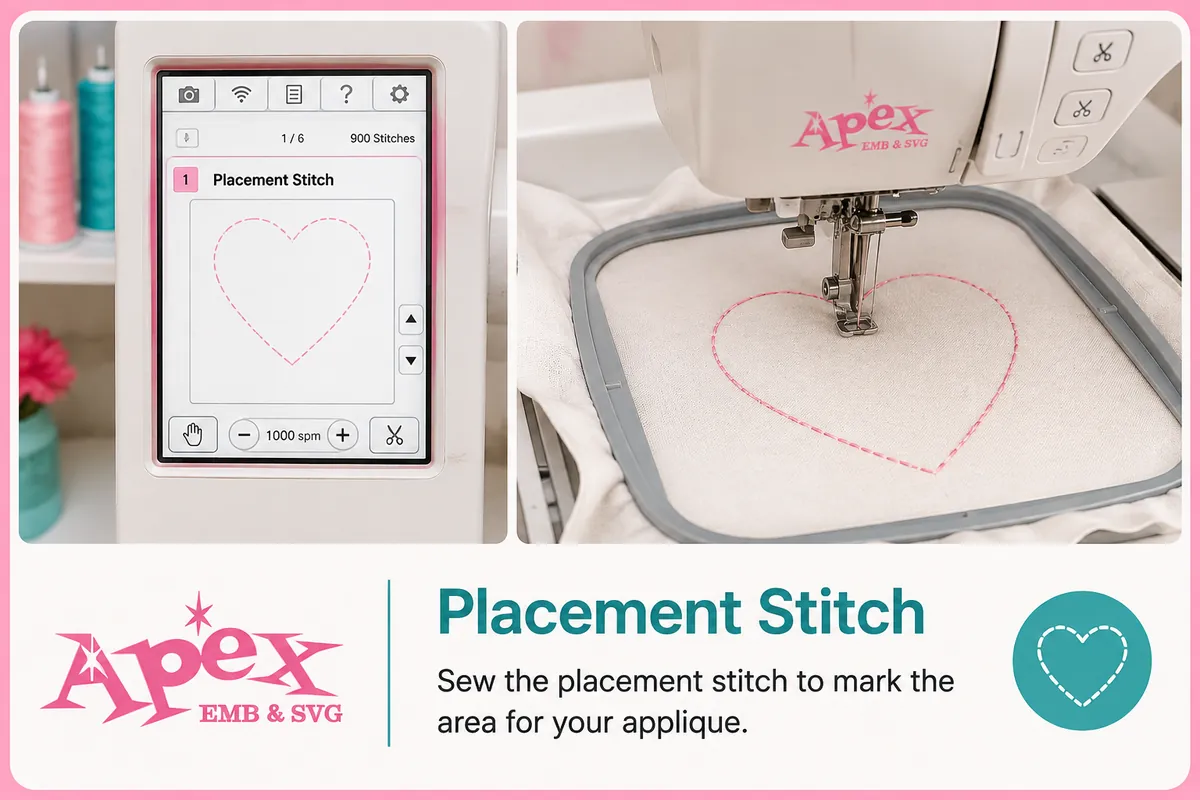
3. Step 2: Running the Placement Stitch
Once your project is hooped and loaded onto the embroidery machine, you are ready to begin the actual applique sequence.
The first important element is the placement stitch.
What Is a Placement Stitch?
A placement stitch is a simple outline that shows exactly where your applique fabric needs to be positioned.
It does not permanently secure the applique fabric.
Instead, it acts as a visual guide.
Load your chosen Apex Embroidery Design applique file into your embroidery machine, attach the hoop, verify the orientation, and proceed to the first applique placement sequence.
The machine will stitch an outline directly onto the base fabric.
Once the placement stitch finishes, the machine should stop.
Do not remove the base material from the hoop.
Check the Position Before Continuing
Before adding your applique fabric, confirm that:
- The placement outline is located where you expected.
- The design orientation is correct.
- Nothing underneath the hoop is caught in the embroidery area.
- The project remains securely hooped.
This is your easiest opportunity to catch a positioning mistake.
Precision matters because every later stage of the applique process is aligned to this original outline.
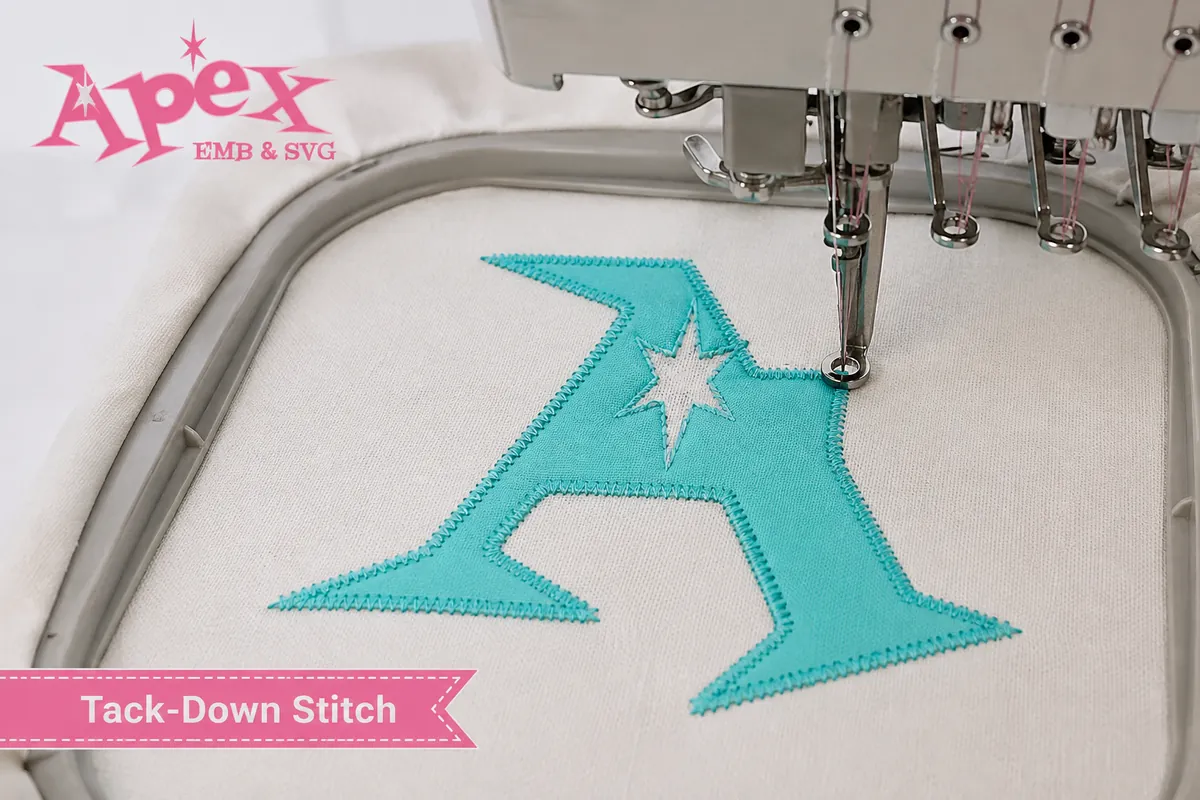
4. Step 3: Fabric Placement & Tack-Down Stitch
Now the applique fabric is added.
Take your prepared applique fabric and position it over the placement outline.
Completely Cover the Placement Stitch
Your applique fabric must extend beyond the entire placement line.
Do not try to align the raw edge of your fabric directly with the placement stitch.
Instead, use a fabric piece that is comfortably larger than the outlined area.
Check every side before restarting the machine.
There should be no exposed portion of the placement outline underneath your applique fabric.
Secure the Fabric if Needed
Depending on the project, you can temporarily hold the applique fabric in place with:
- Temporary fabric adhesive
- Fusible web
- Embroidery-safe tape placed outside the stitching path
Avoid using large amounts of spray adhesive. Excess adhesive can accumulate on needles and create unnecessary residue.
Run the Tack-Down Stitch
The machine will now sew the tack-down stitch.
This second outline secures the applique fabric to the project and defines the exact area that needs to remain after trimming.
A professionally digitized Apex Embroidery Design applique file positions the tack-down stitch to work correctly with the later decorative border.
After the tack-down sequence is complete, stop the machine before the finishing stitch begins.
Watch Your Thread Tension
If the tack-down stitching looks excessively loose, tangled, or pulled tightly into the fabric, check your machine's tension and threading.
Before changing tension settings dramatically, verify the basics:
- Is the machine threaded correctly?
- Is the presser foot in the correct position?
- Is the bobbin inserted correctly?
- Is the needle damaged or dull?
- Is the thread caught around the spool?
Many apparent "tension problems" are actually threading problems.
5. Step 4: Trimming Excess Fabric — The Critical Step
Trimming is one of the most important skills in machine applique for beginners.
If you leave too much fabric outside the tack-down line, raw fabric may extend beyond the final satin stitch.
If you cut too close and snip the tack-down stitches, the applique fabric may lift before the final border is completed.
The goal is to trim extremely close without damaging the securing stitches.
Remove the Hoop From the Machine
After the tack-down stitch finishes, remove the hoop from the embroidery machine.
However, do not unhoop the project.
Unhooping can alter the fabric position and destroy the registration between your applique and the remaining embroidery.
Turn or angle the hoop so you can comfortably access the applique edge.
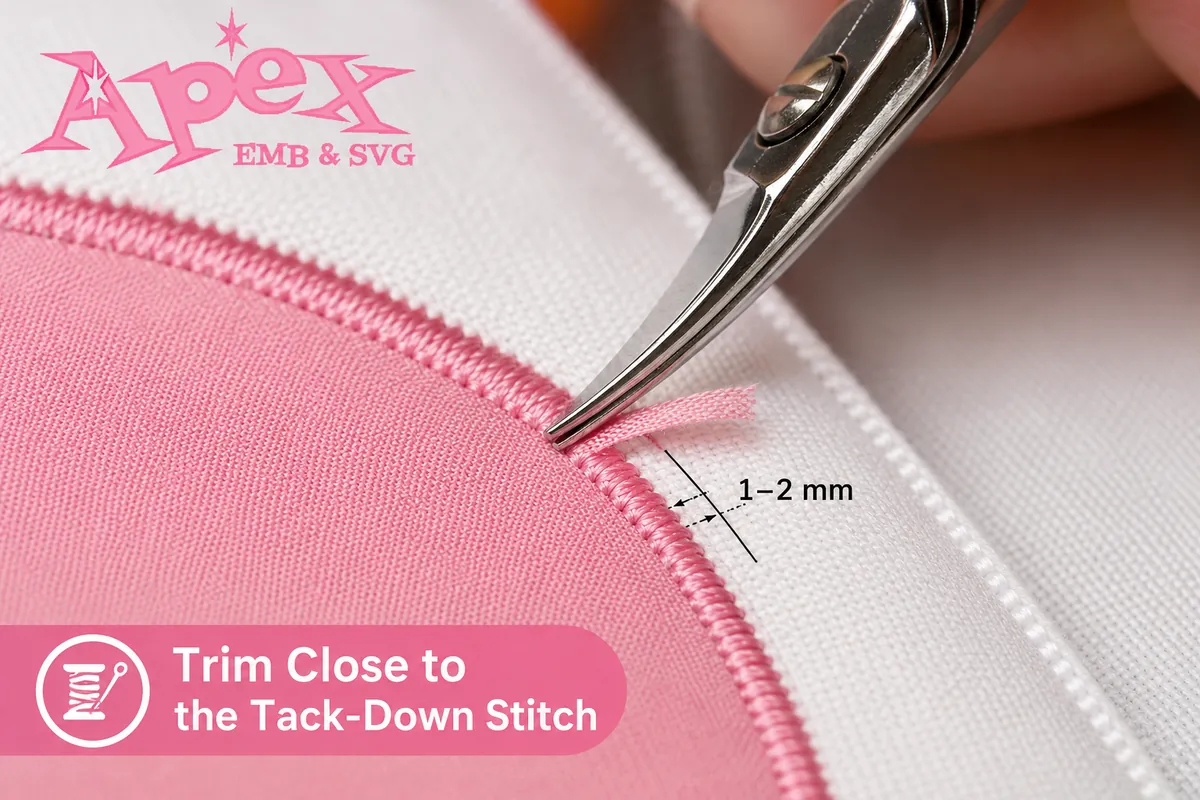
Use Duckbill Applique Scissors
Duckbill scissors are particularly useful for this stage.
One blade has a wide, rounded shape that helps lift the applique fabric slightly while protecting the base fabric underneath.
For clean trimming:
- Keep the flat duckbill section against the base fabric.
- Lift the excess applique fabric slightly.
- Angle the scissors approximately 45 degrees where practical.
- Trim around the tack-down stitching in small, controlled cuts.
Aim to leave approximately 1–2 mm or less around the tack-down line, depending on the border width and design specifications.
The closer and cleaner the trim, the easier it is for the satin border to cover the raw edge completely.
Be Extra Careful Around Curves and Corners
Tight curves require short cuts.
Trying to trim an entire curve with one long scissor movement often creates jagged edges or accidental cuts into the tack-down stitching.
Rotate the hoop as needed rather than forcing your wrist into an uncomfortable angle.
For inside corners, work slowly and avoid cutting through the tack-down thread.
After trimming, run your finger gently around the applique perimeter and look for long fibers or obvious fabric projections.
6. Step 5: Executing the Final Decorative Stitching
After trimming, return the hoop to the embroidery machine.
The remaining raw applique edge must now be covered or finished.
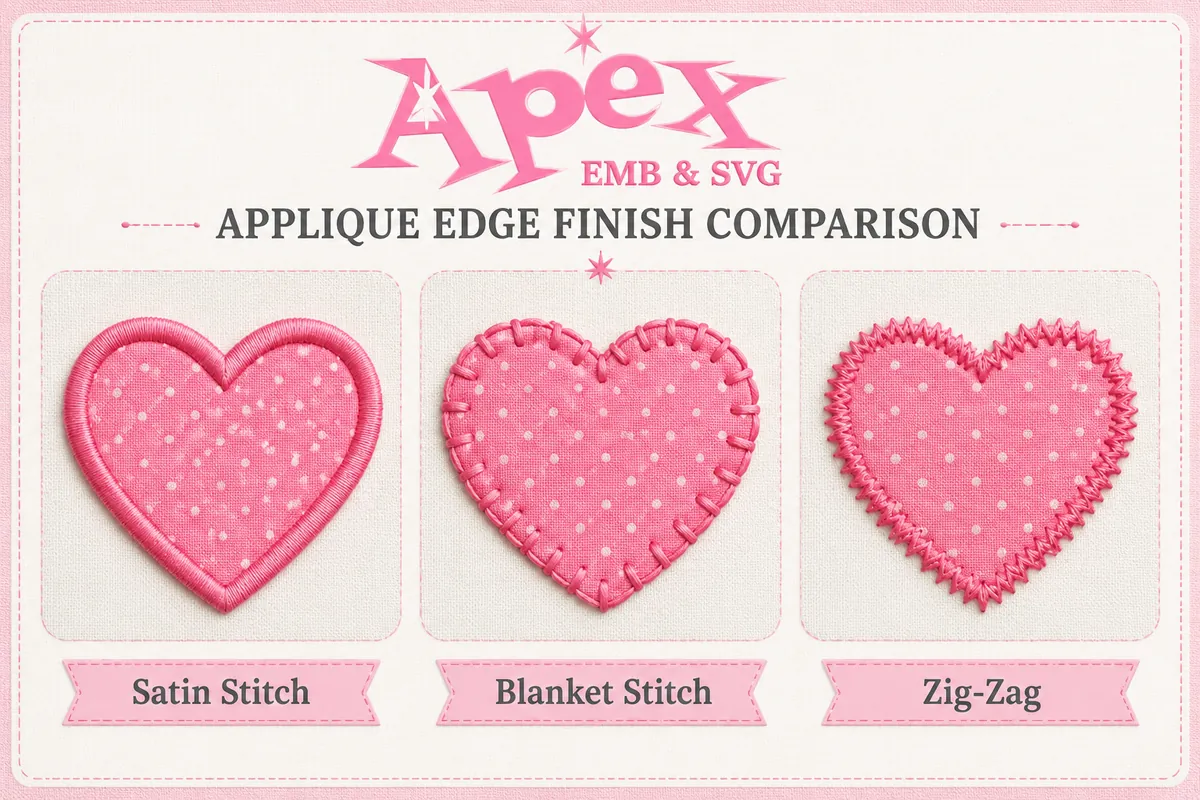
Depending on the design, the machine may use a satin stitch, blanket stitch, zig-zag stitch, or another decorative border.
Satin Stitch
The satin stitch is one of the most recognizable applique finishes.
Closely spaced stitches travel back and forth across the applique edge, creating a smooth, solid border.
A good satin border should:
- Cover the raw applique edge
- Maintain consistent width
- Follow curves smoothly
- Stay aligned with the applique shape
- Avoid excessive density that causes stiffness or puckering
If you are following a professionally digitized design, avoid manually changing stitch density unless you understand how the design was constructed.
The satin coverage, tack-down position, and trimming allowance are designed to work together.
Blanket Stitch
A blanket stitch creates a more traditional or handcrafted appearance.
It is popular for:
- Quilting projects
- Rustic designs
- Children's designs
- Decorative fabric art
Because a blanket stitch does not completely cover the raw edge in the same way as a dense satin stitch, precise fabric preparation and trimming become even more important.
Zig-Zag Stitch
Zig-zag borders create a lighter, more open finish.
They can reduce overall stitch count and provide a casual decorative look.
Again, the best finishing style depends on the intended appearance and the way the original applique file has been digitized.
Stitch Width and Density Matter
The final border must be wide enough to catch both the applique fabric and the surrounding base fabric.
If the border is too narrow, the raw edge may escape the stitching.
If the stitch density is excessive, the design may become stiff or cause the fabric to pucker.
This relationship between placement stitch, tack-down stitch, trimming margin, and satin stitch density is one reason experienced digitizing matters.
With professionally prepared files from Apex Embroidery Design, these technical components are designed as a complete system rather than independent stitching steps.
7. Troubleshooting Common Applique Issues: Expert Tips by Apex Embroidery Design
Even experienced embroiderers occasionally encounter applique problems.
The key is understanding whether the issue comes from stabilization, hooping, trimming, threading, or digitizing.
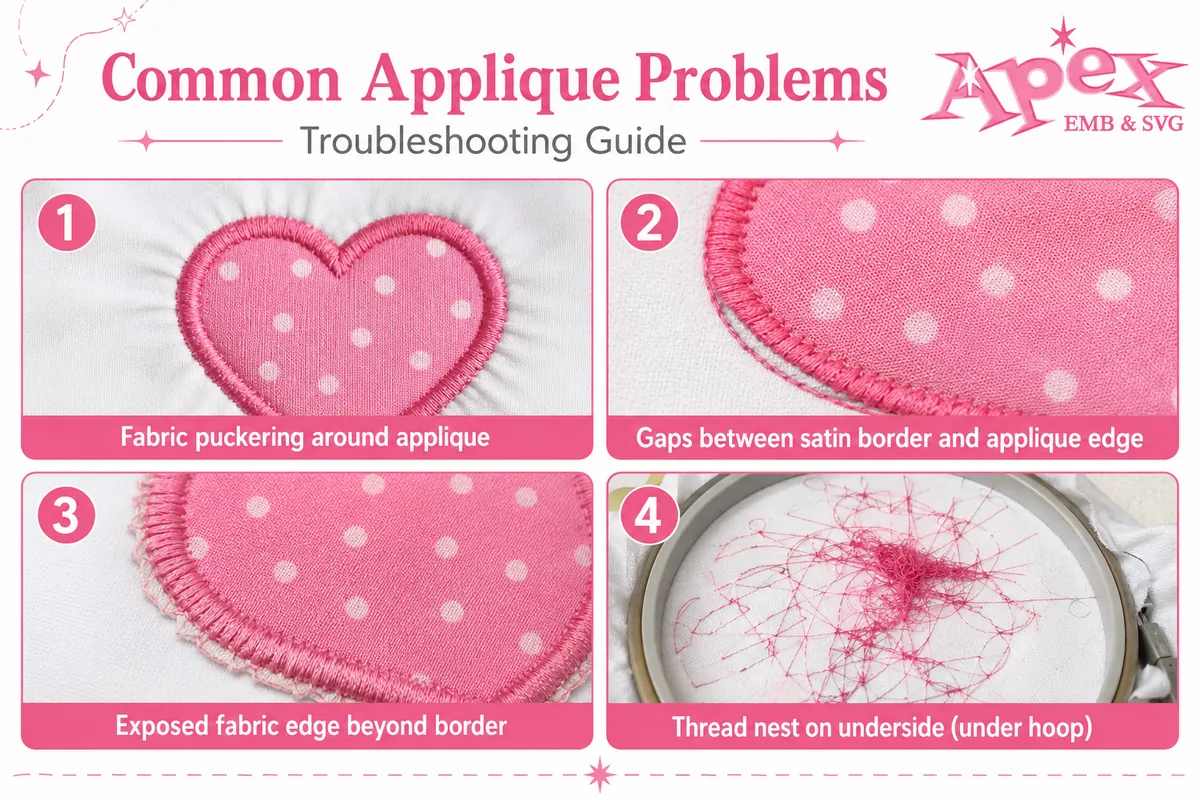
Problem: Fabric Puckering Around the Applique
Puckering usually indicates that the fabric is moving or being pulled during embroidery.
Possible causes include:
- Insufficient stabilization
- Loose hooping
- Stretchy base fabric
- Excessively dense stitching
- Fabric stretched too tightly while hooping
- Poor design registration
To prevent puckering, match your stabilizer to the fabric type and avoid stretching the base fabric during hooping.
For knit or stretchy garments, a quality cut-away stabilizer is generally a safer choice.
Problem: Gaps Between the Satin Border and Applique Fabric
If you can see gaps between your applique fabric and the satin stitch, first inspect your trimming.
Possible causes include:
- Cutting inside the tack-down line
- Fabric shifting before or during tack-down
- Poor registration
- Inadequate stabilization
- A badly digitized design
Your applique fabric should remain underneath the decorative border.
Good Apex Embroidery Design files are digitized so the placement, tack-down, and border sequences align properly when the project is stabilized and trimmed correctly.
Problem: Fabric Sticking Out Beyond the Satin Border
Visible fabric fibers usually mean the applique was not trimmed close enough to the tack-down stitch.
You may be tempted to pull the fibers out afterward, but pulling can distort the edge.
Instead, carefully trim visible fibers with sharp embroidery scissors.
On your next project, trim closer before running the satin stitch.
Problem: Thread Nests Under the Hoop
A large knot or "bird's nest" of thread underneath the fabric is usually related to machine threading rather than applique fabric.
Stop the machine immediately.
Do not continue stitching over a severe thread nest.
Remove the hoop carefully and inspect the underside.
Then:
- Cut away the tangled thread.
- Check the bobbin.
- Rethread the upper thread path completely.
- Confirm the presser foot and needle are functioning correctly.
- Reattach the hoop without moving the fabric inside it.
- Back up the design to a safe position before the problem occurred.
- Resume slowly.
Never force the hoop away from the machine while tangled thread is still attached.
Pro Tips for Cleaner Machine Applique
Once you understand the basic machine embroidery applique step-by-step workflow, small refinements can dramatically improve your results.
Use Fresh Needles
A worn needle can cause thread breaks, skipped stitches, or inconsistent penetration through layered applique materials.
Replace needles regularly, especially when working through fabric plus fusible backing.
Test New Designs
Whenever possible, stitch a test sample before embroidering an expensive garment or finished product.
A test run helps you evaluate:
- Stabilizer choice
- Thread color
- Applique fabric
- Stitch coverage
- Final dimensions
- Overall appearance
Watch Every Applique Color Stop
Do not assume every stop is simply a thread-color change.
In applique files, a stop may tell you to add fabric, trim fabric, or prepare for a different section of the design.
Review your color sequence before stitching.
Avoid Unhooping Mid-Design
Your embroidery machine relies on precise registration.
Once the project is hooped, keep it in that hoop until the entire embroidery sequence is finished.
You may remove the hoop from the machine for trimming, but do not remove the fabric from the hoop itself.
Start With Beginner-Friendly Designs
Simple shapes with gentle curves are easier to trim than intricate applique designs with numerous sharp corners and tiny interior areas.
Beginners can build confidence with professionally digitized designs before progressing to more complex multi-fabric applique projects.
Frequently Asked Questions About Machine Applique Embroidery
What is the best stabilizer for machine applique embroidery?
The best stabilizer depends on your base fabric and design density.
For stretchy fabrics, knits, garments, and projects that will be washed frequently, cut-away stabilizer generally provides stronger permanent support.
For stable woven fabrics and lighter applique projects, tear-away stabilizer may be appropriate.
When choosing a stabilizer for applique embroidery, consider fabric stretch, final use, stitch density, and the size of the design rather than selecting stabilizer based only on convenience.
Do I need a special foot for machine applique?
If you are creating applique with a computerized embroidery machine and a digitized applique file, the embroidery machine normally performs the placement, tack-down, and decorative stitching automatically using its standard embroidery setup.
A special applique foot is more relevant when creating applique manually on a regular sewing machine.
For machine embroidery applique, the more important considerations are correct hooping, stabilizer, thread, needle selection, trimming tools, and a properly digitized embroidery file.
What is the difference between a placement stitch and a tack-down stitch?
The placement stitch shows where the applique fabric needs to be positioned.
The tack-down stitch is sewn after the applique fabric has been placed over that outline. Its purpose is to secure the fabric so the excess can be trimmed away before the final decorative border is stitched.
How close should I trim applique fabric?
Trim as close to the tack-down stitch as you safely can without cutting the securing thread.
For many designs, approximately 1–2 mm or less is an appropriate working margin, although the exact amount depends on the width of the finishing border.
Sharp duckbill scissors make this process easier.
Can I do machine applique without fusible web?
Yes.
Fusible web is helpful but not mandatory for every design.
It can make applique fabric easier to handle, reduce fraying, and help keep larger fabric pieces flat. However, the necessity depends on the fabric, project, and digitizing method.
Why does my applique satin stitch not cover the fabric edge?
Common causes include inaccurate trimming, fabric shifting, weak stabilization, incorrect hooping, or poor registration in the digitized file.
Make sure the applique fabric completely covers the placement line, the tack-down stitch holds it securely, and the excess fabric is trimmed close to the stitching.
Using professionally digitized applique designs also helps ensure the satin border has enough width and overlap to cover the raw edge.
Where can I find beginner-friendly digitized applique designs?
Beginners should look for designs with clear stitching sequences, uncomplicated shapes, properly aligned placement and tack-down lines, and professionally digitized finishing borders.
Apex Embroidery Design offers professionally digitized applique designs built around the standard placement, tack-down, trimming, and final-stitching workflow, making them suitable for embroiderers who want dependable files while developing their machine applique skills.
Create Cleaner, More Professional Applique With Apex Embroidery Design
Machine applique becomes much easier once you stop thinking of it as one complicated embroidery process and start seeing it as a predictable sequence:
Placement → Fabric → Tack-Down → Trim → Final Stitching.
Prepare your fabric carefully, choose an appropriate stabilizer, use fusible web when additional stability is helpful, follow your machine's color stops, and take your time when trimming.
Most importantly, start with a digitized file designed to keep every stage properly registered.
With professionally digitized applique templates from Apex Embroidery Design, you can spend less time correcting misaligned borders and troublesome stitching and more time creating polished embroidery projects.
Explore Apex Embroidery Design's collection of professional-grade digitized applique designs and choose your next machine embroidery project today.