Hidden


You've hooped your fabric, loaded the design, hit Start – and somewhere between the tack-down stitch and the satin border, everything shifts. The applique fabric bunches, the edge frays, and the result looks nothing like what you envisioned. If that sounds familiar, you're not alone. At Apex, we work with applique embroidery every single day – across delicate handkerchiefs, bold team jackets,... This guide gives you the exact how to applique with embroidery machine, step by step, so you get it right the first time.
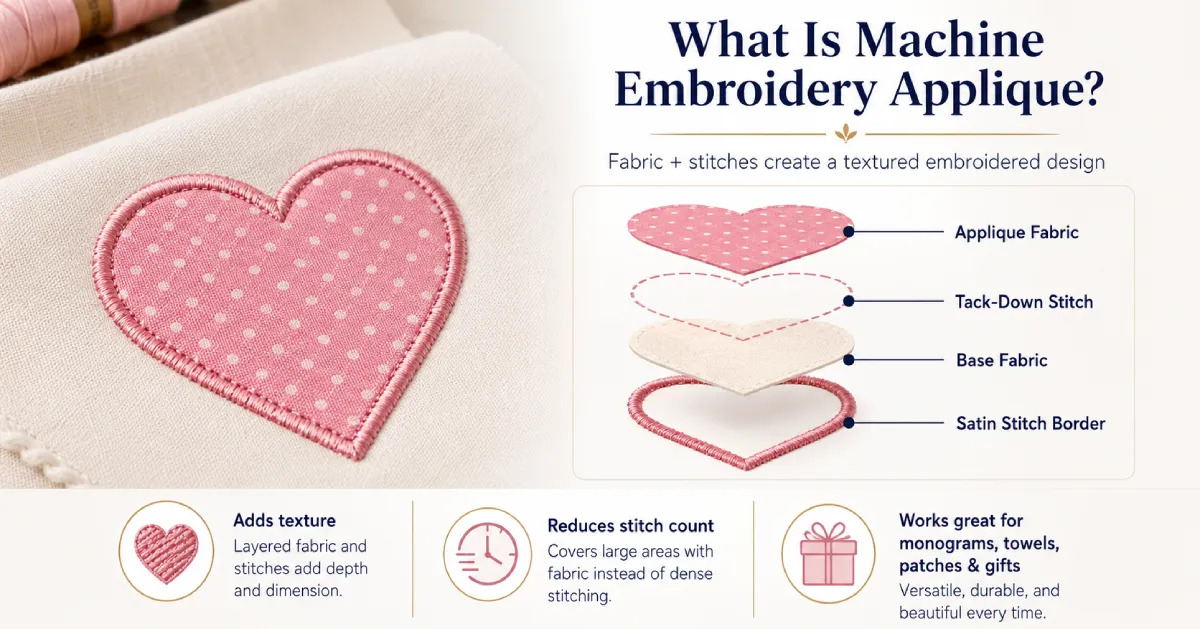
Machine embroidery applique is a technique where a piece of fabric is stitched onto a base material using an embroidery machine. Instead of filling the entire design with thread, the machine uses fabric to create part of the artwork, then secures and finishes the edges with embroidery stitches.
This technique is popular because it adds texture, color, and dimension while reducing stitch count. It works well for monograms, kids’ clothing, towels, blankets, patches, tote bags, and custom gifts. For beginners learning how to applique with embroidery machine, applique is also a practical way to create bold designs without relying on heavy fill stitching.
At Apex, we often look at applique from both the embroidery and digitizing side. A clean applique result depends not only on the machine, but also on proper stabilizer, accurate hooping, careful trimming, and a well-digitized applique design file.
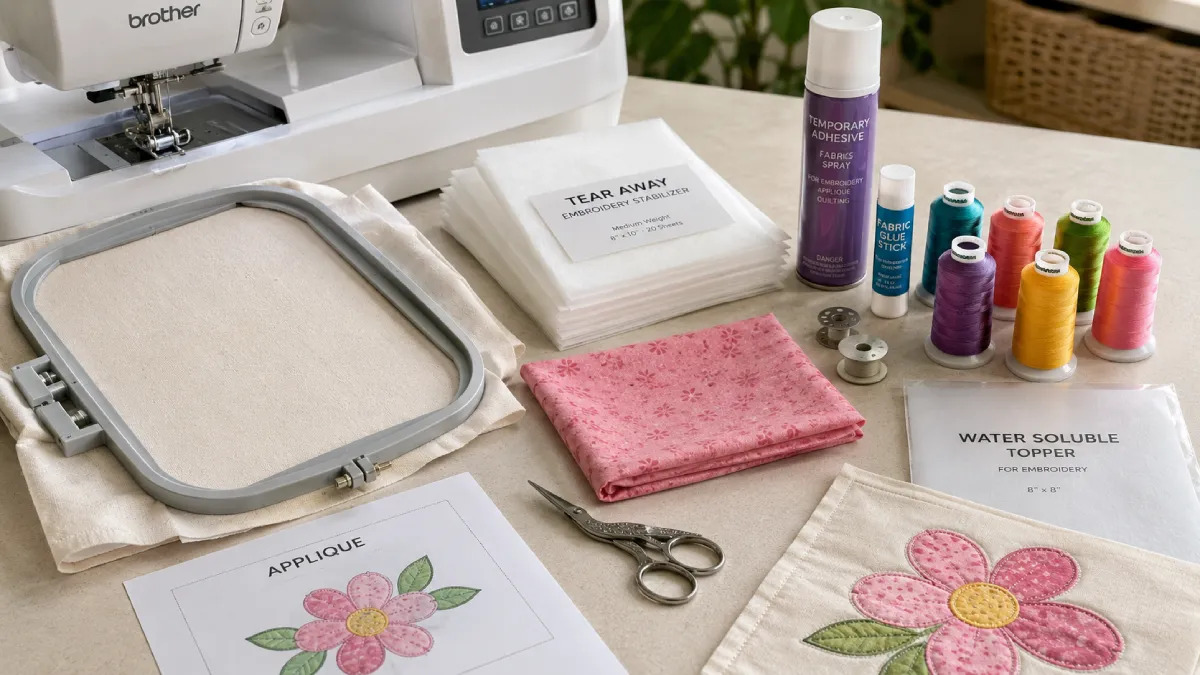
Before learning how to applique with embroidery machine, it is important to prepare the right supplies.
Here are the basic supplies you need:
Once your supplies are ready, the applique process becomes much easier to follow. Most machine embroidery applique designs use the same basic order: placement stitch, applique fabric placement, tack-down stitch, trimming, and final cover stitch. Process how to applique with embroidery machine
Below is a beginner-friendly guide on how to applique using an embroidery machine for cleaner, more professional results.
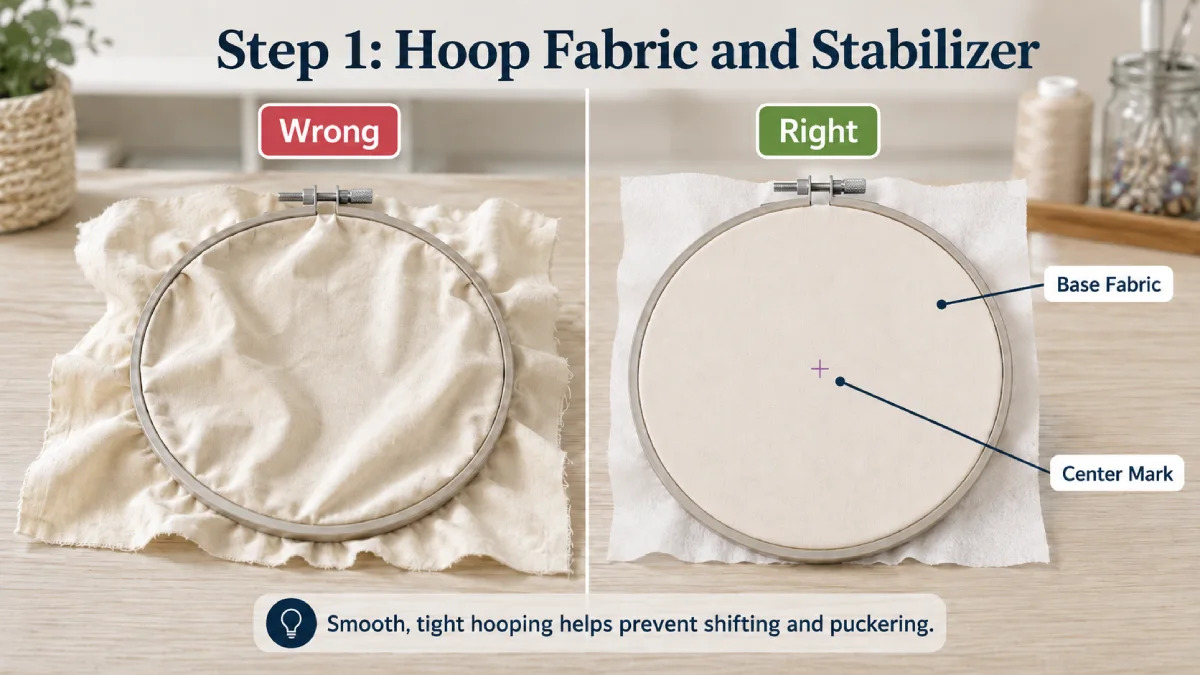
Start by hooping your base fabric with the stabilizer behind it. For stable woven fabrics, tear-away stabilizer is often enough. For stretchy garments, use cut-away or no-show mesh stabilizer for better support.
The fabric should be stretched drum-tight in the embroidery hoop, but not pulled so hard that it distorts.
Apex Tip: Before hooping, mark the center of your fabric with an invisible ink pen. This small step helps you align the applique design accurately and avoid a finished design that sits slightly off-center.
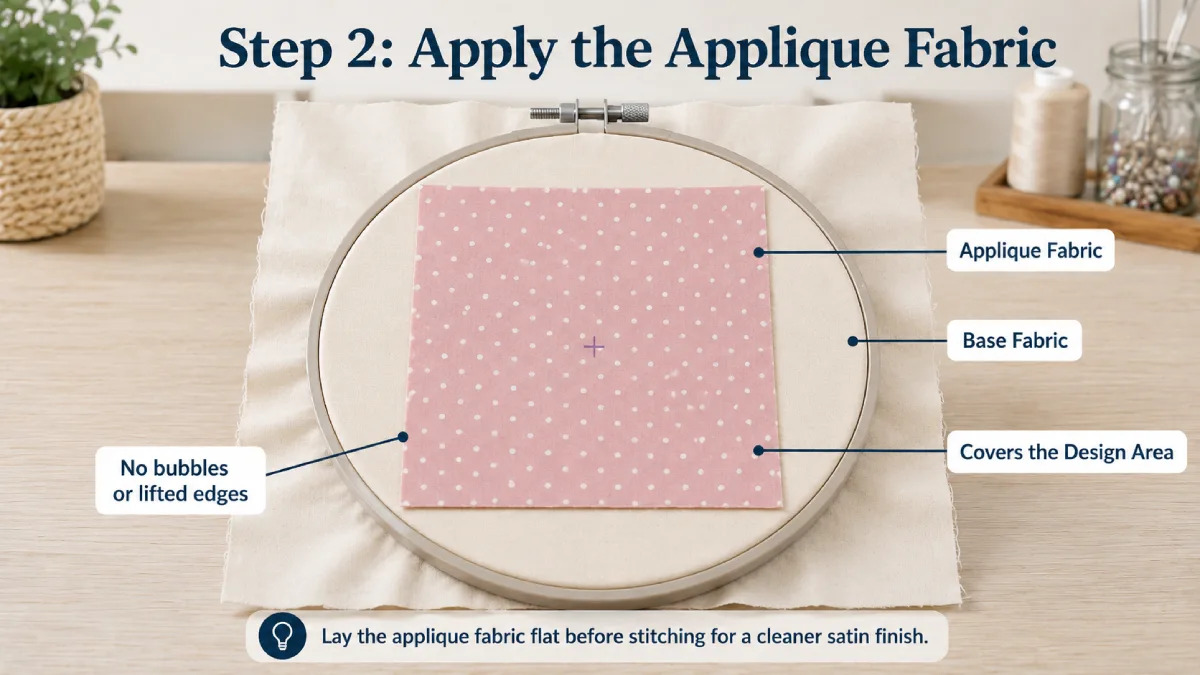
lay your applique fabric piece directly over the design area on the base fabric. Use your center mark as a guide to position it exactly where you want the finished design to sit. The applique fabric should cover the design area completely and lie flat with no lifted edges or bubbles.
If you pre-fused the back with fusible webbing, press briefly with a mini iron to bond it. If not, use temporary spray adhesive to hold the piece in place.
With the applique fabric in position, snap the hoop into the machine and press Start. The machine stitches the applique fabric down to the base – locking it in place with a tack-down stitch that runs along the design shape.
Apex applique designs are digitized with the correct stitch sequence built in – so the machine runs cleanly and pauses at exactly the right moment.
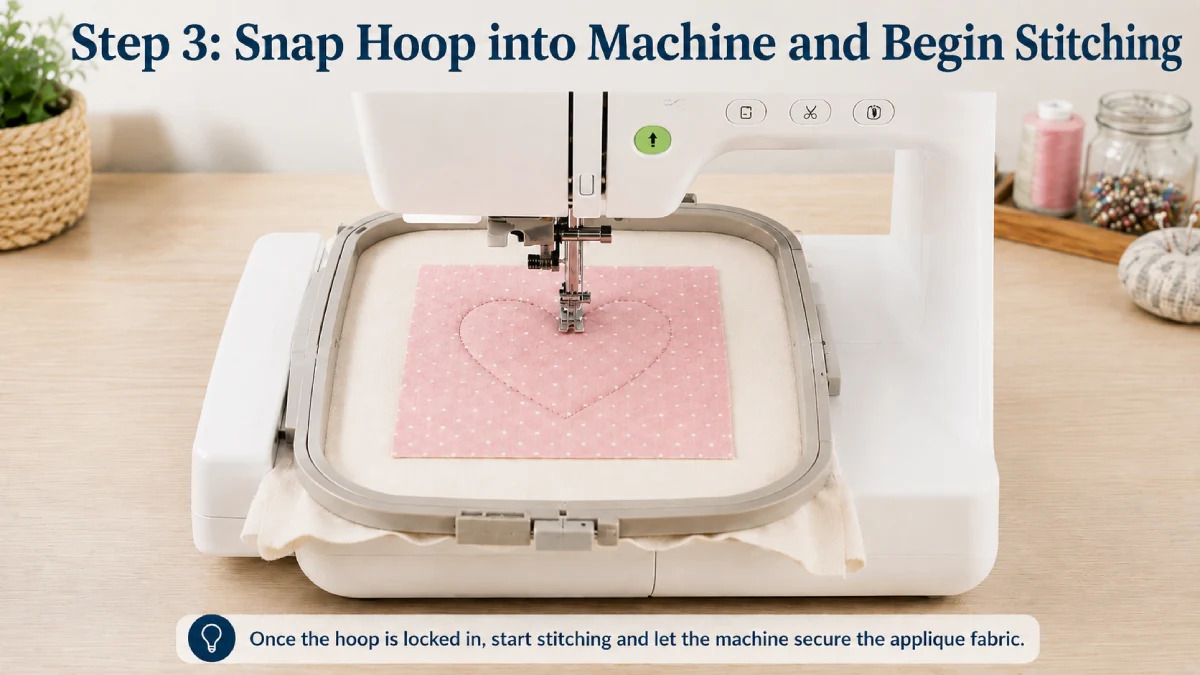
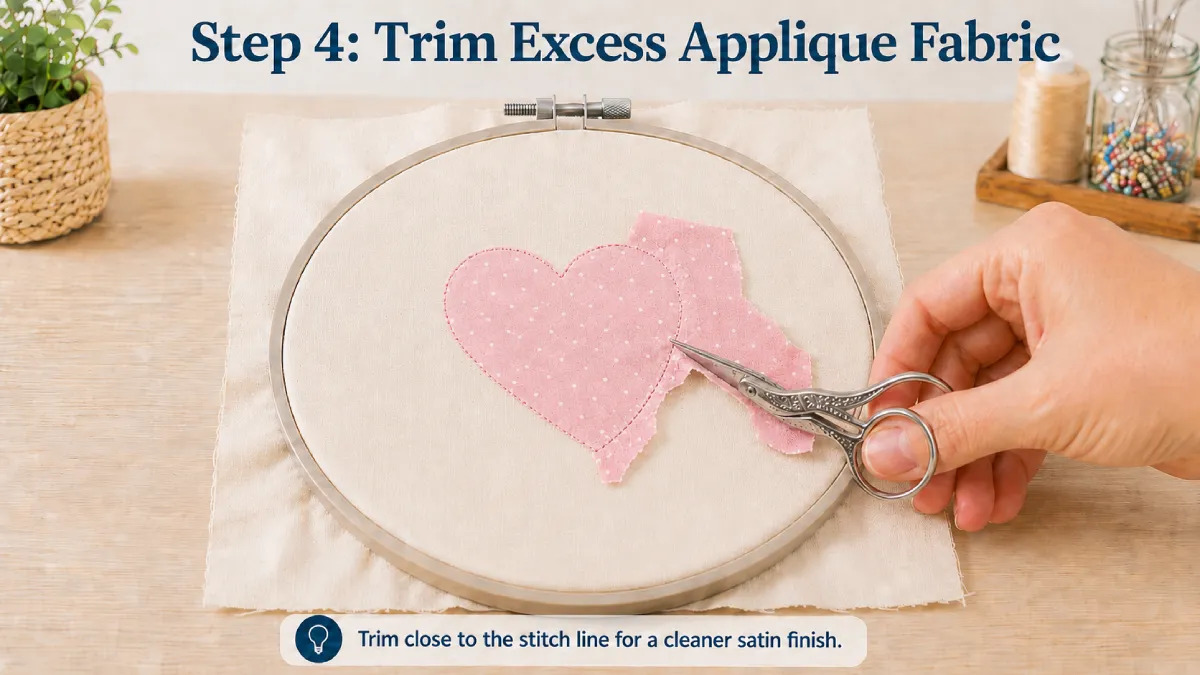
Remove the hoop from the machine. Keep the fabric fully secured inside the hoop – do not detach it.
Using sharp embroidery scissors, cut away all the excess applique fabric outside the stitching. Trim as close to the stitch line as possible. This trim is the single most important step for a sharp final result – a tight, clean cut means the satin stitch covers the edge perfectly.
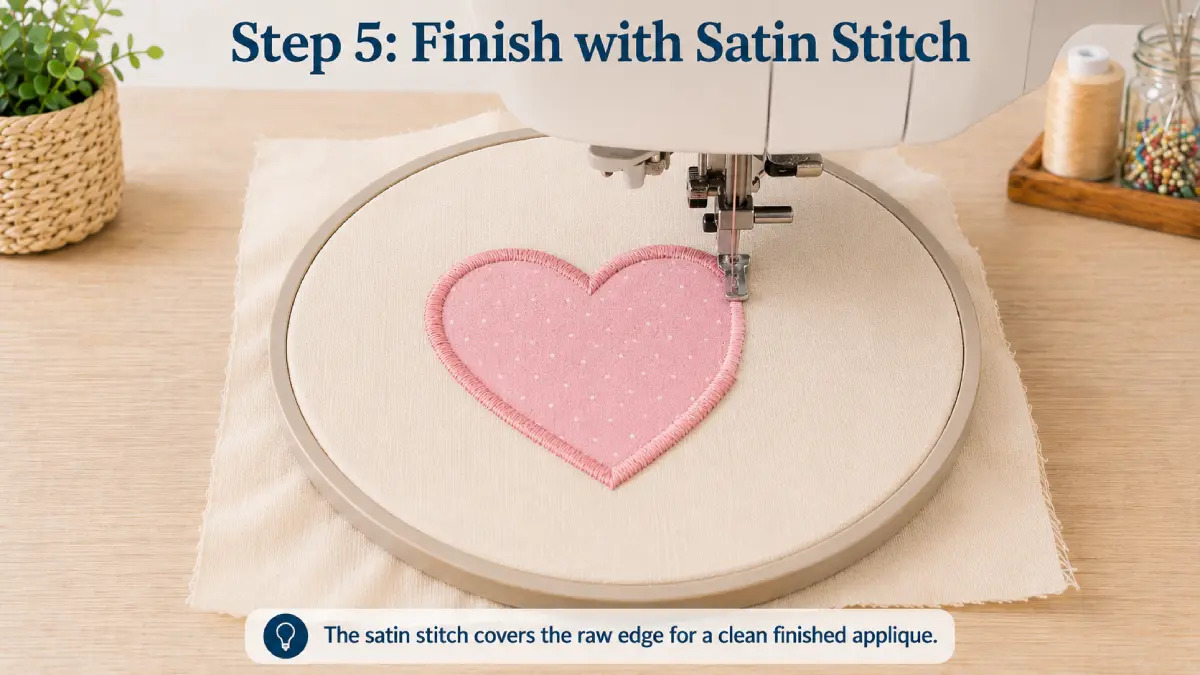
Once the extra fabric is trimmed, snap the hoop back into the embroidery machine and press start again. The machine will finish the applique design with a satin stitch.
The satin stitch covers the raw edge of the applique fabric and gives the design a clean, polished border. During this step, make sure the hoop stays intact and the fabric does not shift.
When the design is complete, remove the hoop from the machine and flip it over. Gently tear away the stabilizer from the back of the fabric.
Once the backing is removed, take the finished piece out of the hoop. Trim any loose threads if needed, and your applique embroidery project is complete.
Want to see the process in action before starting your own project? Apex has a simple applique embroidery video that shows the basic workflow on a handkerchief using an embroidery machine.
This example is especially helpful for beginners who want to understand how the applique process looks in a real project before trying it on shirts, towels, patches, blankets, or personalized gifts.
See how to machine embroidery applique tutorial video: https://www.youtube.com/watch?v=259N6_mN6Ts
Yes, most embroidery machines can do applique as long as they can read the correct embroidery file format and pause between stitch steps.
Stable woven cotton is one of the best fabrics for beginners because it is easy to place, stitch, and trim. Felt, denim, flannel, and some specialty fabrics can also work well, depending on the project.
Applique fabric usually shifts because of loose hooping, not enough stabilizer, slippery fabric, or moving the project after it has already been hooped.
This usually happens when the applique fabric is not trimmed close enough to the tack-down stitch, or when the satin border in the design file is too narrow.
If you want to create your own applique design but do not want to spend hours learning embroidery software, Apex can help turn your logo, image, name, or artwork into a professional machine-ready applique embroidery file.
With 25+ years of embroidery digitizing experience, Apex creates clean applique embroidery files with the right stitch order, placement stitch, tack-down stitch, trimming stop, and final satin or cover stitch.
We can digitize designs for common embroidery machine formats, including PES, DST, JEF, VP3, EXP, HUS, XXX, ART, VIP, SEW, and more.
Custom applique embroidery files are commonly used for:
To prepare your custom applique embroidery file, please provide:
Learning how to applique with embroidery machine becomes much easier once you understand the correct order: hoop the fabric, add the right stabilizer, stitch the placement line, place the applique fabric, run the tack-down stitch, trim carefully, and finish with a satin or cover stitch. For the cleanest results, start with a simple design, stable fabric, sharp trimming scissors, and a properly digitized applique embroidery file.
If you need a logo, monogram, artwork, or custom applique design converted into a machine-ready embroidery file, Apex can help with professional custom embroidery digitizing.
Apex Embroidery has been embroidering and digitizing for 20 years. All our designs and fonts are digitized by hand, each letter.
Copyright © 2026 - Apexembdesigns.com


